One of the things that attracted me to film photography was as a means of connecting to my brother who worked long in photography and for whom it was a great enthusiasm. He spent some time as a commercial photographer.
After his passing some 20 years ago my father and I came into possession of most of his photographs and negatives. Some of these I assembled into a Blurb book. Many others I continue to use as subjects in my dark room for printing. A number of my favorites were ones taken during a backpacking trip to the Maze District in Canyonlands Utah we took together. This trip is outlined in a prior
posting on this blog.
Among some I printed as 12x16 for a project are the following.
 |
| Maze Cottonwood 12x16 |
 |
| Maze Juniper 12x16 |
 |
| Maze Waterfall portrait |
 |
| Maze Waterfall landscape |
My brother took a combination of black and white and color slides on his Hasselblad. The one below I thought would make a good addition to the set. however this one is a color slide. In general I like the range of tones the rock and its patina take on in black and white.
 |
| Red Cliffs in the Maze |
In an earlier
post I explored the use of a paper internegative to good effect. One drawback is that most paper is orthochromatic and so insensitive to red light. For the above photo it might render the red sandstone as white and thus lose the contrast between the layers of the rock. This time I decided to use a film internegative in hopes of improved image quality. I would use panchromaic film to capture all the luminosity of the image. The basic process is to get a contact print of the color slide onto the black and white film.
The basis for this is a 6x9 roll film holder for a 4x5 camera. It accepts 120 film and has a darkslide. At 6x9 there are 8 exposures to the roll of film.
 |
| 6x9 roll film holder (left) and dark slide (right). The small rectangle is where the slide film contacts the B and W film. |
 |
| Roll film holder top view. |
The difficulties with the endeavor are many. 1) the entire process must occur in complete darkness, 2) I know of no practical way to meter the exposure, 3) getting a consistent exposure.
With no way to meter the exposure a series of test exposures will be required to get the negative correctly exposed. This means a way of creating precise exposures. Fortunately when I setup my enlarger it only came with a 50mm lens suitable for 35mm enlargements. Instead I used an old 75mm lens with shutter and diaphragm from another camera for making enlargements from 120 film. This I setup using the T shutter setting for normal use. Now I had a selection of shutter speeds so I could use the enlarger as a precisely timed light source. I could use a series shutter snaps to increase the exposure.
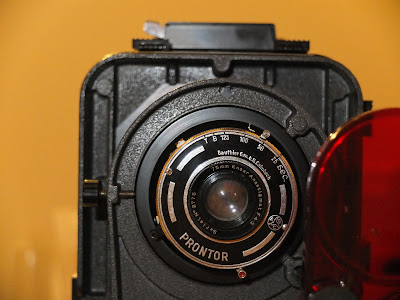 |
| Enlarger lens with shutter. |
I had an old roll of Ilford Delta 3200 already loaded in the film back. I made a test strip. My plan was to save film and only use one image from the roll of film.
In complete darkness I opened the darkslide, placed the slide film in contact with the negative. I then placed the film back under the enlarger which is set in its lowest position. I chose this position as it would be simple to reproduce. I covered all but a small strip of the negative (this all had to be done by feel), turned on the enlarger and with the aperture set to f5.6 and with the shutter set to 1/125 second I snapped one shot. I moved the cover and snapped again, then 2 snaps, then 4 snaps. I then attempted to cut the frame from the film back with an exacto knife. Do not do this, it is a very bad idea. In advancing the film afterwards it got completely bound up in the mechanism and ruined the rest of the roll.
I developed the Delta 3200 at ASA 800. From this I guessed about 3x 1/125 at f5.6. Unfortunately I didn't have anymore of that film so I switched to Ilford HP5+ to create the negatives. I switched to f8. I then planned 4 exposures as follows 2x, 4x, 6x, and 8x at 1/125sec. The next 4 I would use the same sequence but on another image.
It was apparent during the exposures another problem of working without light. During the brief flash of light from the shutter I could see the slide film was not always square to the film. I also found I had to push the edges of the slide film under the edges of the film holder which was difficult and fraught with possible film damage. It was very difficult to judge the orientation of the slide film on the negative film. After development at box speed I found I had decent images though often crooked. The most exposed image was the best.
 |
| Example of a misaligned contact print. |
The Troubles in the Cave.
A central part of the image I was using is a cave the interior of which on the slide film is readily seen. This would turn out to be the challenge. From the original color image I opted for a close-in crop which I mocked up digitally here...
 |
| Digital mock-up of desired crop. |
I set about printing the 8x image on Fomabrom Variant 123. A FB VC paper. This paper I like for its velvety texture and good blacks. It is a difficult paper though as I found again as there does not seem to be much contrast variation between filtration levels. I use split filter printing and this makes for some difficulty when the high and low contest filters don't exhibit much difference. This is probably made worse with an internegative where contrast is typically increased in the negative.
For a long time when I first started split filter printing I had a set of filters that spanned #0 to #5. Later I acquired a wider range which gave me #00 at the low end. I used this for some time but eventually found #00 was too soft and I opted instead for #1 for the low contrast filter. This was mostly on Ilford paper however.
 |
| Test strip #5 8-64 seconds in half stop times |
 |
| Test strip #1 8-64 seconds in half stop times |
There is hardly any difference in the #1 and #5 filtration test strips. I eventually went to a #00 to get soft gradation.
 |
| Test strip #00 8-64 seconds in half stop times |
Once I had made test strips and small test prints I found I had to dodge the cave. Even so this yielded not so good results with greyish low contrast cave interior. Inspection of the negative proved little detail in the cave. I needed to make a longer exposure when making the internegative.
 |
| Result of the HP5+Negative |
Now I looked to my film stock and I had no more HP5+. So I moved to FP4+ which is box rated at ASA 125. This constant switching of film speeds cannot be helpful. The re-calibration of exposures and variability of development made me constantly on the low side of the exposures despite my efforts otherwise. Finally I had not consulted my notes and had assumed the best exposure on HP5+ was 4x 1/125 not 8x 1/125. My calculations doomed me to a number of underexposed negatives. I wanted to follow the adage of expose for the shadows and print for the highlights.
I also wanted to try and address problems from the last round. Firstly I would trim the slide film along the top and bottoms very close to the image and I would load the slide film in 'sideways' in orientation. This would keep me from having to slide the edges under the edges of the film holder while retaining the edges for frame and film identification and for use in a scanner.
I hoped this would help me keep the film square to the negative film in the holder. Next I wanted to make the slide film lay flat on the negative film so I cut a piece of glass to fit the 6x9 opening in the film holder. I wanted to attach the slide film to this plate,ahead of time but could not think of a way that would not damage the film and allow it to be in perfect contact to the negative. I settled for making a ‘stop’ at one edge a couple of cello tape thicknesses (less than the slide film thickness). This meant I could advance the film against it an know the slide would stay in place. I abandoned using this after one use as I was too worried about scratching the slide film. I also fashioned a loop of tape as a handle to remove the piece of glass why I was done.
 |
| Glass plate for contact printing. A tape loop extends form the bottom to allow it to be removed. A strip of tape along one edge serves as a stop for the slide film. |
I loaded the new film and set about making more exposures. I recalculated the exposure for the slower film and settled on a shutter speed of 1/25 second and a plan of x, 3x, 4x, 6x, and 8x. 8x was the best but owing to an error on my part I should have probably gone to a higher exposure. Never-the-less the 8x showed more detail in the cave and after 3 prints I had a satisfactory result. Now however I struggled to tame the highlights. Here is the result...
Some reading I had done indicated I might tame the contrast by overexposing a stop and pulling the development by 20%. I decided not to add another variable. It is just as well I didn't as my error meant I had no overexposed images. I will probably do so my next attempt when I am not changing film speeds.
I re-examined my confused calculations of exposure based on
EV from my notes. It reveals a lot about my on-the-hoof calculations and confusion I created for myself. First I want to calculate the EV for each selected exposure on each different film, This is in the table below...
| Film |
Speed |
EV Used |
| Delta 3200 |
800 |
10 |
| HP5+ |
400 |
10 |
| FP4+ |
125 |
9 |
The problem is obvious. When going from the 800 speed film to 400 speed film I kept the same EV. It should have been one stop faster (9 instead of 10). From 400 speed to 125 (let's call it 100) speed I only opened it up 1 stop and should have been 2 stops (8 instead of 9).
To help prevent this problem in the future I made simple table for the shutter speeds and apertures on my enlarger. (This is based on the
Wikipedia article.) It is probably easiest to not use the 1/125 shutter speed as the others are all one stop from each other. (In the table the EV values are rounded and this means the 1/125 shutter speed EV looks identical to the 1/100 shutter speed EV values. This is due to truncation of the fractional part of the EV in the table. They are in fact about .4 EV different.) At a given f-stop a lower EV can be had by a slower shutter speed. Since f 4.5 and 1/25 is the smallest EV (9) if a lower EV is required then the shutter must be opened twice as often for each EV increment lower desired. In other words to hit EV 8 one would set f 4.5 and 1/25 and operate the shutter twice, 9 would require four shutter releases, (Since we are not concerned about depth of field all EVs are equivalent, this is not true when taking photographs.)
|
|
f-stops |
|
|
4.5 |
5.6 |
8 |
11 |
16 |
22 |
| Shutter
Speeds (1/n) |
125 |
11 |
12 |
13 |
14 |
15 |
16 |
| 100 |
11 |
12 |
13 |
14 |
15 |
16 |
| 50 |
10 |
11 |
12 |
13 |
14 |
15 |
| 25 |
9 |
10 |
11 |
12 |
13 |
14 |
I bought a batch of more film for the next phase and settled on PanF+ from Ilford. It is very high resolution and speed is not a problem here. Reading on various forums I see the warnings about developing immediately as the latent image retention is not great. This is not a problem as I will process the roll immediately. I also want to pull the film a stop to reign in the contrast. EV 8 at 100 ASA I should shift to EV 7 for equivalent exposure at 50 ASA. The film is probably slower still so EV 6 might be safer. I decided on the following brackets. I biased to over-expose given I will pull the developing by 20%.
| PanF+ Bracket EVs |
1/25th shutter at f4.5 |
| 5 |
16 |
| 6 |
8 |
| 7 |
4 |
| 8 |
2 |
Based on Massive Devchart and my developer temperature of 22C for Ilford LC29 (1+19) the development time should have been 3:24. I reduced this to 2:42 for pull processing.
Here are the scanned results. the crops are irregular again because getting the negative square in the film holder remains a challenge.
 |
PanF+ Internegatives
Upper left EV 5
Upper right EV 6
Lower left EV 7
Lower right EV 8 |
It looks promising at EV 5 and EV 6 with lots of detail in the interior of the cave. The test will if the highlights get blown out or not.Below is a test EV 5 negative on Ilford MGIV RC paper enlarged to an 8x10. I think it is a really good print after all this work and learning. The negative is quite contrasty as I could print it with a #00 filter only.
 |
| Ilford MGIV Deluxe; f11; #00 64 sec; 8x10; |
 |
| Ilford MGIV Deluxe; f11; #00 64 sec; 8x10; #5 11 sec; |


Comments